What is Surya Namaskar?
Surya Namaskar translates to “salutation to the sun” — “Surya” meaning the sun and “Namaskar” meaning a greeting or bow.
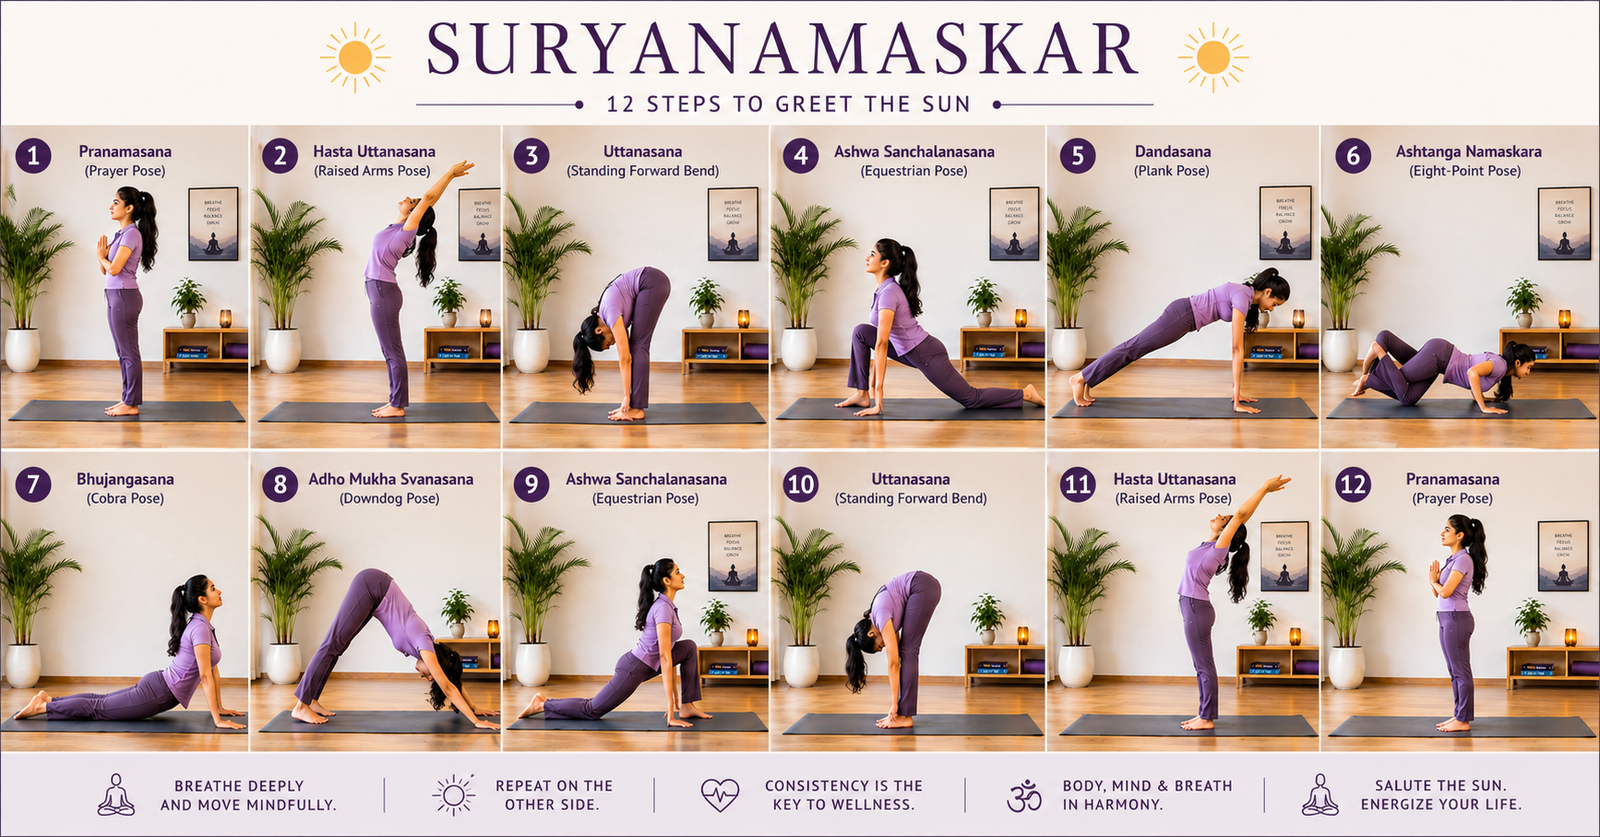
At its heart, it is a sequence of 12 yoga postures performed in a smooth, continuous flow.Each pose moves seamlessly into the next, with movements timed to the breath — an inhale here, an exhale there — which differentiates it from simply performing 12 separate exercises one after the other.
Think of it as a moving prayer.
Your body bends, stretches, folds, and extends in a rhythm that has been practiced by Indians for centuries, typically facing the rising sun.Yoga teachers and fitness experts often refer to Surya Namaskar as a complete workout on its own.This reputation is due to the fact that it combines three key elements in one session:
- Stretching to improve flexibility
- Strength training to build muscle tone
- Breathing to promote calm and focus
Most exercises typically work on one of these aspects at a time, but Surya Namaskar tackles all three simultaneously, making it effective for a wide range of goals — weight loss, posture improvement, or simply starting the day with a sense of clarity.
History and Meaning of Surya Namaskar
Before becoming a staple in yoga studios around the world, Surya Namaskar originated from ancient India’s deep connection with the sun — not just as a celestial body, but as a symbol of consciousness.
Early yogis viewed the sun as the source of all energy and vitality.Practicing towards the sun each morning was not just a form of exercise, but also an act of reverence.
The structured 12-step sequence that most people practice today was formalized in the early 20th century, particularly through the royal court of Aundh in Maharashtra.
It was then adopted by yoga schools across India before eventually spreading to the West.Each of the 12 steps is associated with one of the twelve traditional names of the sun god, which is why each pose in the sequence often has a corresponding mantra.This provides a sense of completeness — a full philosophy condensed into a twelve-minute morning routine.
However, you don’t need to understand the philosophy to benefit from it.
Remove the spiritual aspect, and the practical value still holds: Surya Namaskar is a daily habit that helps you greet the day with movement and gratitude rather than immediately reaching for your phone.
Why Surya Namaskar Matters Today
In a world filled with fitness trends that require subscriptions, equipment, or a lot of space, Surya Namaskar is almost effortless.
It only needs a mat and enough floor space to lie flat.About fifteen minutes is all that’s needed.This alone explains much of its enduring popularity, but there are deeper reasons behind its staying power:
- No equipment is required — just a mat and open space the size of your body
- It can be done in as little as 10–15 minutes for a basic routine
- It works the whole body rather than focusing on a single muscle group
- It is adaptable for any fitness level, from beginners to advanced practitioners
- It connects physical movement with breathing and mental focus in a way most gym routines do not attempt
For someone who is managing work, family, and a busy schedule, this combination is hard to beat.
Who Should Practice Surya Namaskar
Almost anyone in reasonably good health can practice it — and that’s not just marketing, it’s how the practice is designed.
The speed, depth, and number of rounds can all be adjusted to suit individual needs.A 60-year-old and a 16-year-old can both do Surya Namaskar, though they may do it differently.
It tends to suit:
- Students seeking better focus and flexibility
- Working professionals who carry tension in their necks and shoulders
- People looking for a home routine that doesn’t require going anywhere
- Senior citizens who prefer a gentler, modified version
- Beginners with no prior yoga experience
- Individuals managing weight without extreme measures
If you have any existing health condition — such as pregnancy, a recent surgery, or a heart condition — it is important to consult your doctor before starting.
Even if the practice looks gentle on video, it may feel very different in your own body.
Printable Surya Namaskar Chart
Print this page or save it as a quick reference for daily practice. Stick it near your mat for the first few weeks, until the sequence becomes second nature and you no longer need to glance at it.
| # | Pose Name | Breath | Quick Cue |
| 1 | Pranamasana | Normal | Stand tall, palms together at chest |
| 2 | Hasta Uttanasana | Inhale | Arms up, gentle backbend |
| 3 | Hastapadasana | Exhale | Fold forward, hands toward floor |
| 4 | Ashwa Sanchalanasana (right leg back) | Inhale | Lunge back, look up |
| 5 | Dandasana | Exhale | Plank, straight line |
| 6 | Ashtanga Namaskara | Exhale | Knees-chest-chin down |
| 7 | Bhujangasana | Inhale | Lift chest, Cobra pose |
| 8 | Adho Mukha Svanasana | Exhale | Hips up, inverted V |
| 9 | Ashwa Sanchalanasana (left leg back) | Inhale | Lunge other side |
| 10 | Hastapadasana | Exhale | Fold forward again |
| 11 | Hasta Uttanasana | Inhale | Rise up, arms overhead |
| 12 | Pranamasana | Exhale | Return to standing, palms together |
Best Time to Do Surya Namaskar
Tradition suggests practicing in the early morning, facing the rising sun, on an empty stomach.
There are practical reasons behind this recommendation.In the morning, your stomach is naturally empty, making forward bends more comfortable.Your mind is also less cluttered with the noise of the day, allowing for a more focused and peaceful practice.Starting the day with something intentional — before messages come in or the schedule kicks in — sets a tone that is hard to replicate later in the day.
That said, if mornings don’t work for your schedule, the early evening is a viable alternative.
The most important rule is to wait at least three to four hours after a meal before practicing.The most important variable isn’t the time of day but whether you can consistently repeat the practice every single day.
How Many Rounds Should You Do Daily?
There isn’t a universal number.
It depends on your starting point, how your body is feeling that week, and how honest you are about your current fitness level.As a general guide:
| Level | Suggested Rounds |
| Absolute beginner | 2–4 rounds |
| Building consistency (week 2–4) | 4–6 rounds |
| Intermediate practitioner | 6–12 rounds |
| Advanced / fitness goal focused | 12+ rounds |
It’s also important to clarify that a “round” typically means completing the 12-step sequence twice — once with the right leg stepping back first, and once with the left — since the sequence isn’t perfectly symmetrical in the lunge steps.
One thing that beginners often overlook is that four rounds done with correct form and steady breathing will do more for you than twelve rushed, sloppy ones.
The quality of each movement is especially important in the first few weeks.
Should You Do Surya Namaskar on an Empty Stomach?
Yes — or at least two to three hours after a light meal.
Several of the steps involve deep forward bends and twists.Practicing on a full stomach can cause discomfort at best and nausea at worst, neither of which is ideal for building a lasting habit.
Doing it first thing in the morning is fine, as long as you start with a small glass of warm water.
Avoid tea, coffee, or anything heavier before beginning.
Morning vs Evening Surya Namaskar: Which is Better?
Here’s a comparison to help decide:
Morning vs Evening Surya Namaskar: Which is Better?
| Factor | Morning Practice | Evening Practice |
| Energy levels | Sets a calm, energised tone for the day | Helps release the day’s accumulated stress |
| Stomach condition | Naturally empty, ideal for bends | Needs a 3–4 hour gap after meals |
| Environment | Quieter, fresher air (especially outdoors) | More traffic noise, indoor air in cities |
| Consistency | Easier to build as a fixed habit | Can get skipped due to evening plans |
| Best suited for | Students, early risers, weight-loss focused practice | Office workers with early morning constraints |
Both morning and evening practice have their own benefits.
Choose the one you can genuinely show up for every day — not the one that sounds more virtuous on paper.
Who Should Avoid or Modify Surya Namaskar
Surya Namaskar is widely accessible, but certain conditions may make some or all of the sequence unsuitable — at least without the guidance of a professional:
- Pregnant women, especially after the first trimester (prenatal yoga is a better option)
- Individuals with a recent hernia, slipped disc, or spinal injury
- People recovering from abdominal or back surgery
- Those with uncontrolled high blood pressure or heart disease
- Individuals with severe wrist, shoulder, or knee injuries
- Anyone recovering from a fracture
If you fall into any of these categories, it is important to consult with your doctor or a certified yoga therapist before starting.
A general article can offer guidance, but it cannot assess your specific condition.
Safety Precautions Before You Begin
- Warm up your wrists, neck, and ankles for a minute or two before starting — this step is often ignored, and it is where many beginners end up with unnecessary soreness
- Use a non-slip yoga mat on a flat surface
- Wear comfortable, breathable clothing that allows for movement
- Make your movements slow and controlled, especially during the first few weeks
- Mild discomfort is part of stretching; sharp pain is a sign to stop
- Maintain a two to three-hour gap after meals
- Stay hydrated throughout the day, but avoid drinking large amounts of water right before practice
- If you feel dizzy, breathless, or lightheaded, stop and rest — do not push through it
Common Mistakes Beginners Make
| Mistake | Why It’s a Problem | Quick Fix |
| Holding the breath instead of syncing it | Reduces oxygen flow, increases fatigue | Match one breath to one movement, always |
| Rushing through all 12 steps | Increases injury risk, reduces benefit | Slow down, especially in week 1-2 |
| Locking the knees in standing poses | Strains the knee joint over time | Keep a soft micro-bend in the knees |
| Collapsing the lower back in Cobra pose | Can cause lower back strain | Engage the core, lift through the chest |
| Skipping the warm-up | Increases risk of muscle pull | Always do a 2-minute joint warm-up first |
| Comparing yourself to advanced practitioners online | Leads to overstretching and frustration | Focus on your own daily progress only |
| Practicing on a full stomach | Causes discomfort, nausea | Maintain a 2-3 hour gap after meals |
| Ignoring pain signals | Can turn a minor strain into an injury | Stop and rest if you feel sharp pain |
Scientific, Mental, and Spiritual Benefits of Surya Namaskar
Scientific Benefits
What makes Surya Namaskar truly effective, rather than just traditionally revered, is the combination of elements it delivers.
It includes stretching, light strength training, and controlled breathing, all woven into one continuous sequence. Most workouts train only one of these areas.Surya Namaskar trains all three simultaneously.
Studies suggest that regular practice can support cardiovascular fitness, flexibility, and muscular endurance, as the sequence works the arms, legs, spine, and core in every round.
This covers a significant range of physical areas for something that fits on a mat.
To clarify: Surya Namaskar is a supportive practice, not a medical treatment.
It should complement whatever care your doctor recommends, never replace it.
Mental Benefits
This is something people often don’t expect.
The breath-led nature of the sequence makes it as much a mental exercise as it is a physical one.
Synchronizing breath with movement has a way of calming a busy mind — not because someone told you to relax, but because your attention has something specific to follow.
The rhythm is repetitive enough to become meditative without being boring.Many practitioners find that a consistent morning practice reduces mental fatigue and improves focus, even on days when they approach it reluctantly.
It’s also, frankly, a much gentler way to start the day than whatever your phone is waiting to show you.
Spiritual Benefits
For those drawn to the traditional side, Surya Namaskar is a practice of gratitude — an acknowledgment of the sun’s role in sustaining life, energy, and growth.
Each step has a corresponding mantra and a name of the sun god it honors.
That said, you don’t have to subscribe to any belief system to practice it.
Many people do Surya Namaskar as pure exercise, while others connect with the mantras and the symbolism.Both approaches are valid.The practice holds up either way.
Surya Namaskar for Weight Loss, PCOS, Diabetes, Heart Health and More
Weight Loss
Done
Surya Namaskar 12 Steps (Complete Table with Names)
This is the full surya namaskar 12 steps breakdown — Sanskrit name, English name, how to perform it, breathing, benefits, common mistakes and muscles used in each step.
| Step | Sanskrit Name | English Name | How to Perform | Breathing | Main Benefits | Common Mistakes | Muscles Used |
| 1 | Pranamasana | Prayer Pose | Stand at the front of the mat, feet together, palms joined at the chest | Normal breathing | Centres the mind, improves standing balance | Slouched shoulders, uneven weight on feet | Core, shoulders |
| 2 | Hasta Uttanasana | Raised Arms Pose | Raise both arms overhead, gently arch back and look up | Inhale | Stretches abdomen, expands chest and lungs | Over-arching the lower back | Shoulders, spine, abdomen |
| 3 | Hastapadasana | Hand to Foot Pose (Standing Forward Bend) | Bend forward from the hips, bring palms towards the floor beside the feet | Exhale | Stretches hamstrings and spine, calms the mind | Rounding the back instead of hinging at hips | Hamstrings, lower back |
| 4 | Ashwa Sanchalanasana | Equestrian Pose (Low Lunge) | Step the right leg back into a deep lunge, left knee bent, look up | Inhale | Opens hip flexors, strengthens legs | Front knee going past the toes | Hip flexors, quadriceps, glutes |
| 5 | Dandasana | Stick Pose (Plank) | Step the left leg back to join the right, body in one straight line | Exhale (or brief breath hold) | Builds core and arm strength | Sagging or raised hips | Core, shoulders, arms |
| 6 | Ashtanga Namaskara | Salute with Eight Parts | Lower knees, chest and chin to the floor, hips slightly raised | Exhale (or hold breath out) | Strengthens arms and chest | Collapsing the lower back | Chest, arms, knees |
| 7 | Bhujangasana | Cobra Pose | Slide forward, lift the chest using back muscles, elbows slightly bent | Inhale | Opens the chest, strengthens the spine | Using only the neck instead of the back to lift | Spine, chest, shoulders |
| 8 | Adho Mukha Svanasana | Downward Facing Dog | Lift the hips up and back, forming an inverted V shape | Exhale | Stretches hamstrings, calves and spine; calms the mind | Heels forced flat too early, rounded back | Shoulders, hamstrings, calves |
| 9 | Ashwa Sanchalanasana | Equestrian Pose (other leg) | Step the right leg forward into a lunge, left leg back | Inhale | Opens hips, balances both sides of the body | Rushing without proper alignment | Hip flexors, quadriceps |
| 10 | Hastapadasana | Standing Forward Bend | Bring the left foot forward to meet the right, fold forward | Exhale | Stretches spine and hamstrings | Bouncing into the stretch | Hamstrings, lower back |
| 11 | Hasta Uttanasana | Raised Arms Pose | Roll up to standing, raise arms overhead, gentle backbend | Inhale | Stretches the front body, opens the chest | Lifting too fast and losing balance | Shoulders, spine |
| 12 | Tadasana / Pranamasana | Mountain Pose / Prayer Pose | Return arms down, stand tall, palms together at the chest | Exhale | Restores calm, completes the round | Rushing straight into the next round without pausing |
All 12 Surya Namaskar Asanas Explained in Detail
- Pranamasana (Prayer Pose)
Every round starts and ends here. Stand at the edge of your mat, feet together or hip-width apart depending on what feels stable, and bring your palms together at the centre of your chest. The classic greeting position.
This pose looks almost too simple — and that’s exactly why beginners rush past it. Your weight should be spread evenly across both feet, spine tall, shoulders dropped away from your ears rather than hunched up into them. Close your eyes if you’re comfortable. Take one slow, deliberate breath.
That pause is the point. It marks the transition from the scattered pace of daily life into something more focused. Yoga teachers consistently say that Pranamasana done properly sets up everything that follows — practicing without it is a bit like starting a meeting without a clear agenda. You eventually get somewhere, but with less intention than you might have liked.
- Hasta Uttanasana (Raised Arms Pose)
Inhale as you sweep both arms up and overhead. Keep them shoulder-width apart, or let the palms touch if your shoulders allow it without strain. Gently arch your upper back, tilt your head back slightly, and keep the neck relaxed — you’re looking up, not compressing your cervical spine.
The goal isn’t to bend as far back as possible. It’s to create one long, even stretch from your hips all the way up through your fingertips. Push your hips forward slightly to avoid squishing your lower back.
For anyone who spends most of their day curled over a screen, this particular stretch hits somewhere immediately noticeable. It opens the chest and front body, and begins expanding lung capacity before the deeper folds ahead.
A small, controlled backbend done well beats a dramatic one done badly every time.
- Hastapadasana (Standing Forward Bend)
Exhale as you hinge forward from your hip joints — not your waist — bringing your torso toward your legs. Palms aim for the floor beside your feet, fingertips down if a full fold isn’t accessible yet. Bending your knees slightly is not just acceptable for beginners, it’s often recommended.
The key here is leading with your chest rather than your head, so the fold originates from the hips instead of rounding the spine. That distinction protects your lower back and actually delivers a much better hamstring stretch.
There’s a reason forward bends appear in almost every yoga tradition — they have an almost immediate calming effect on the nervous system. Something about folding inward physically seems to translate into folding inward mentally.
Don’t worry if your palms don’t meet the floor for the first few weeks. Forcing it mostly just risks a hamstring strain, which will sideline you far longer than it would take to simply let flexibility build naturally.
- Ashwa Sanchalanasana (Equestrian Pose / Low Lunge)
Inhale as you step your right leg back into a deep lunge. Left knee bent directly above the left ankle; right leg extended back with the knee hovering or gently lowered to the floor. Gaze lifts up.
The name comes from the stance of a horse rider, and you can feel why. It stretches the front of the back leg’s hip with an intensity that surprises most people who spend most of their day seated. Tight hip flexors are arguably the most common postural complaint in modern life, and this pose addresses them directly.
Keep the front knee tracking over the toes rather than caving inward. Hands rest on either side of your front foot for support, fingertips lightly touching the ground. Over weeks, as the hip flexors open up, you’ll find you can lunge deeper and lower without the same effort.
- Dandasana (Plank Pose)
Exhale as you step your left leg back to meet the right, bringing your whole body into one straight line — a high plank. Hands shoulder-width apart, directly under your shoulders. Fingers spread wide for stability. Core and thighs engaged to keep the hips from dropping.
This is the strength step of the sequence, and it asks something different from everything before it. The arms, shoulders, core, and legs all fire simultaneously. Even holding it for a few extra seconds each day will build noticeable core strength over a month.
The most common error: letting the hips sag, which loads the lower back unnecessarily. Draw the belly button gently toward the spine — not so hard that you’re holding your breath, just enough to maintain that straight line.
- Ashtanga Namaskara (Salute with Eight Parts)
From the plank, exhale and lower your knees, chest, and chin to the floor while keeping your hips slightly raised. Eight points of contact with the ground: two feet, two knees, two hands, chest, chin. Hence the name.
It resembles a push-up paused halfway, and it takes genuine control to lower smoothly rather than just dropping. That controlled descent is the exercise — gravity will do it for you if you let it, but the strength benefit disappears when you do.
Beginners commonly let their hips sink too low here, which over-arches the lower back. Keep your hips lifted just slightly higher than they’d be in a full push-up, and think of each lowering as a slow, deliberate choice rather than a fall.
- Bhujangasana (Cobra Pose)
Inhale as you slide your body forward and lift your chest up. The lift should come from your back muscles, not from pushing hard through your hands. Elbows stay slightly bent, close to your sides. Shoulders away from the ears.
The lower ribs stay on or just above the mat. This is what makes it a Cobra rather than a full backbend — and it’s the distinction that keeps the lower back safe. The chest leads; the arms assist.
Bhujangasana is the natural antidote to the posture that screens produce. It opens the chest, strengthens the upper spine, and for desk-bound people, it tends to feel almost therapeutic after just a few rounds.
Resist the temptation to push as high as possible using your arms. A smaller, back-muscle-led lift does more for you than a dramatic one achieved by straining your lumbar spine.
- Adho Mukha Svanasana (Downward Facing Dog)
Exhale and lift your hips up and back, arms and legs straightening to form an inverted V. Heels reach toward the floor — they don’t need to touch it, especially not at first. Head hangs relaxed between your upper arms.
This is one of the most recognisable yoga poses in existence, and it earns that status. In one shape, it stretches the calves, hamstrings, spine, and shoulders simultaneously. Press your palms firmly into the mat, draw the hips up and back (rather than just pushing the chest down), and if your hamstrings are tight, bend your knees as much as you need to.
Downward Dog is also a gentle inversion, which increases blood flow toward the head. Many practitioners find it naturally calming — some even pause here for several breaths before moving on. That’s not wrong. Let it be a rest if you need it.
- Ashwa Sanchalanasana (Equestrian Pose, Opposite Leg)
Inhale as you step your right foot forward between your hands. Right knee above the right ankle, left leg extended back. A mirror image of step four.
This second lunge balances out the sequence, making sure both sides of the hip flexors and legs receive equal attention across a full round. Same alignment principles apply: front knee over the ankle, back leg strong and extended, gaze lifted without straining the neck.
Most beginners notice one side feels tighter or less stable than the other. This is normal, and worth paying attention to — it’s information about muscular imbalances that tend to level out with consistent practice.
- Hastapadasana (Standing Forward Bend, Return)
Exhale as you bring the left foot forward to meet the right, folding back into the standing forward bend.
This second fold reinforces the hamstring and spine stretch, and signals to your body that you’re making your way back to where you started. Same form cues: hinge from the hips, lead with the chest, soft bend in the knees if the hamstrings are pulling.
Pause here for a moment. Notice how the fold feels compared to step three — usually a little deeper, a little looser. The body warms up fast when given the right movements.
- Hasta Uttanasana (Raised Arms Pose, Return)
Inhale as you roll up through your spine — vertebra by vertebra, rather than snapping upright — raising your arms overhead into the same gentle backbend you came through at the beginning.
Rolling up slowly matters more than most people realise. A quick snap puts unnecessary load on the lower back. A slow, vertebra-by-vertebra rise keeps it protected and makes the transition feel more integrated.
By this point in the round, breathing has usually settled into something deeper and more natural. The chest opens again. If you pay attention, the backbend feels meaningfully different from the one at the start — more available, more released.
- Tadasana / Pranamasana (Return to Standing)
Exhale as you bring your arms back down, palms joining at the chest in the same prayer position you started with.
Stand still. Notice your heartbeat. Feel how the body has changed since step one — usually warmer, looser, and quieter in some way that’s hard to explain but easy to feel.
This closing pose is the mirror of the opening one, and rushing past it is the same mistake as rushing past the beginning. Take two or three breaths here. Then, if you’re doing another round, begin again.
This completes one half of a full round. Repeat steps four through nine with the opposite leg leading to finish the second half.
<a name=”mantras-in-hindi”></a>
Surya Namaskar Mantra in Hindi (All 12 Mantras)
Each of the 12 steps in Surya Namaskar is traditionally paired with a short mantra, recited mentally or softly aloud, each honouring a different name and quality of the sun.
| Step | Sanskrit Mantra | Hindi | English Meaning |
| 1 | ॐ मित्राय नमः (Om Mitraya Namah) | ॐ मित्राय नमः | Salutations to the friend of all |
| 2 | ॐ रवये नमः (Om Ravaye Namah) | ॐ रवये नमः | Salutations to the one who shines brightly |
| 3 | ॐ सूर्याय नमः (Om Suryaya Namah) | ॐ सूर्याय नमः | Salutations to the one who induces activity |
| 4 | ॐ भानवे नमः (Om Bhanave Namah) | ॐ भानवे नमः | Salutations to the one who illuminates |
| 5 | ॐ खगाय नमः (Om Khagaya Namah) | ॐ खगाय नमः | Salutations to the one who moves through the sky |
| 6 | ॐ पूष्णे नमः (Om Pushne Namah) | ॐ पूष्णे नमः | Salutations to the nourisher and giver of strength |
| 7 | ॐ हिरण्यगर्भाय नमः (Om Hiranyagarbhaya Namah) | ॐ हिरण्यगर्भाय नमः | Salutations to the golden, cosmic source of life |
| 8 | ॐ मरीचये नमः (Om Marichaye Namah) | ॐ मरीचये नमः | Salutations to the rays of the sun |
| 9 | ॐ आदित्याय नमः (Om Adityaya Namah) | ॐ आदित्याय नमः | Salutations to the son of Aditi (cosmic mother) |
| 10 | ॐ सवित्रे नमः (Om Savitre Namah) | ॐ सवित्रे नमः | Salutations to the one who brings everything into being |
| 11 | ॐ अर्काय नमः (Om Arkaya Namah) | ॐ अर्काय नमः | Salutations to the one fit to be praised |
| 12 | ॐ भास्कराय नमः (Om Bhaskaraya Namah) | ॐ भास्कराय नमः | Salutations to the one who leads toward light and wisdom |
How to use these mantras: As you move through each step, recite the matching mantra mentally — or softly aloud if that suits you. You don’t need to memorise all twelve at once. Many beginners start by simply chanting “Om” with each movement and add the full mantras gradually, as the sequence itself becomes familiar. Getting the physical practice right comes first.
<a name=”shlok”></a>
Surya Namaskar Shlok with Meaning
Before beginning the practice, many traditional yoga schools recite a short Sanskrit invocation to the sun — the Surya Dhyana Shlok, or meditation verse:
ध्येयः सदा सवितृमण्डलमध्यवर्ती नारायणः सरसिजासनसन्निविष्टः। केयूरवान् मकरकुण्डलवान् किरीटी हारी हिरण्मयवपुर्धृतशंखचक्रः॥
English Meaning: “One should always meditate upon the divine being who resides at the centre of the solar orb — seated upon a lotus throne, adorned with armlets and shark-shaped earrings, crowned and garlanded, with a radiant golden form, holding a conch and a discus.”
Importance of the Shlok
This verse isn’t a requirement for practicing Surya Namaskar. It’s entirely optional. It appears in many traditional yoga classes as a way to set a quiet, focused intention before the physical sequence begins — a moment of deliberate stillness before deliberate movement.
For practitioners who connect with yoga’s spiritual dimension, reciting the shlok (or simply sitting with closed eyes for a few breaths) helps create the mental shift from task-list mode to something more present. For those who prefer a secular practice, a few quiet breaths work just as well. The intention behind the gesture matters more than the specific gesture itself.
Surya Namaskar Positions and Body Alignment
How deeply you move matters far less than how correctly you move. Here’s what to prioritise in each type of position:
Standing positions (Pranamasana, Tadasana): Weight even across both feet, spine long, shoulders down and relaxed — not tense and creeping toward your ears.
Backbend positions (Hasta Uttanasana, Bhujangasana): The lift should come from your chest and upper back, not by forcing your neck or putting pressure on your lower back. Smooth, controlled movement is always more effective than trying to lift too high.
Forward fold positions (Hastapadasana): Hinge from the hip joints, not the waist. A soft bend in the knees is fine, especially with tight hamstrings.
Lunge positions (Ashwa Sanchalanasana): Front knee stacked directly above the front ankle, back leg extended and active, hips squared forward rather than twisting to one side.
Plank position (Dandasana): Shoulders over wrists, body in one straight line from head to heels, core lightly engaged throughout.
Inverted position (Adho Mukha Svanasana): Hips lifting up and back, spine lengthening, heels reaching — not forced — toward the floor.
Getting these details right significantly reduces injury risk and ensures you’re actually getting what each pose promises, rather than going through the motions.
<a name=”benefits-table”></a>
Surya Namaskar Benefits Table (Complete Overview)
| Benefit | Scientific Explanation | Who Benefits Most |
| Weight management | Combines movement and elevated heart rate, supporting calorie expenditure as part of an overall routine | Anyone managing weight, especially with diet support |
| Improved flexibility | Repeated stretching of hamstrings, spine and hip flexors increases range of motion over time | Beginners, desk workers, seniors |
| Better posture | Strengthens spinal and core muscles that support an upright position | Office workers, students |
| Stress reduction | Synchronised breathing activates the parasympathetic (calming) nervous system response | Working professionals, students, anyone under daily stress |
| Improved digestion | Forward bends and backbends gently massage abdominal organs | Anyone with sluggish digestion or bloating |
| Better sleep quality | Reduces mental restlessness, which is often a barrier to falling asleep | Anyone with irregular or light sleep |
| Cardiovascular fitness | Moderate, continuous movement supports heart and lung efficiency | Adults of all ages practicing consistently |
| Core strength | Plank and related poses directly engage the abdominal and back muscles | Beginners building foundational strength |
| Hormonal support | Stress reduction and improved circulation support overall hormonal balance | Women managing PCOS or irregular cycles (alongside medical care) |
| Joint mobility | Gentle, repeated movement through full range keeps joints lubricated | Senior citizens, sedentary individuals |
| Mental focus | Breath-movement coordination trains sustained attention | Students, anyone with a busy or distracted mind |
| Lung capacity | Deep inhales and exhales paired with movement expand breathing capacity | Anyone with shallow, chest-only breathing habits |
| Back pain relief (mild) | Strengthens and gently stretches muscles supporting the spine | Desk workers with non-structural back stiffness |
| Skin health | Improved circulation and reduced stress can support a healthier complexion | Anyone seeking a natural lifestyle-based glow |
| Energy levels | Movement and breathwork combined often reduce the mid-morning energy slump | Office workers, students, new mothers |
| Balance and coordination | Lunge and standing poses require and build proprioceptive balance | Senior citizens, beginners |
| Immune support | Movement, breath, and stress reduction together support overall immune function | Anyone looking to support general wellness |
| Confidence and body awareness | Regular practice builds familiarity and comfort with one’s own body and movement | Beginners, especially those new to physical activity |
Beginner’s Guide to Starting Surya Namaskar
How Many Rounds to Start With
Start with two to four rounds. This may feel almost too easy in the first session — that’s by design. The goal in week one isn’t intensity. It’s learning the sequence correctly and beginning to build the habit.
Breathing for Beginners
Don’t stress about syncing breath perfectly in your first week. Focus on one simpler goal: don’t hold your breath. As the movements become familiar, the breath will naturally start aligning itself with each step. Trying to master everything at once is a reliable way to give up early.
Speed of Practice
Go slowly. A single mindful round takes one to two minutes. Rushing through it in twenty seconds misses both the stretch and the calming effect — you might as well not have bothered.
Common Beginner Mistakes
- Trying to complete too many rounds before your body is ready, only to end up sore for several days.
- Pushing too deeply into forward bends, which can increase the risk of straining your hamstrings.
- Jumping straight into the sequence without taking time to warm up properly.
- Comparing your flexibility to advanced practitioners in online videos (their bodies have had years; yours has had a week)
A Simple 4-Week Progress Plan
| Week | Rounds | Focus |
| Week 1 | 2–3 rounds | Learning the sequence, correct alignment |
| Week 2 | 3–4 rounds | Starting to sync breath with movement |
| Week 3 | 4–6 rounds | Building consistency, slightly increasing pace |
| Week 4 | 6–8 rounds | Comfortable flow, considering adding mantras |
Surya Namaskar for Weight Loss
How It Helps
At a brisk but controlled pace, Surya Namaskar gets the heart rate up while working the whole body — a combination that supports weight management when done consistently and paired with sensible eating. It’s a real cardio-and-strength hybrid, not a gentle stretch masquerading as a workout.
Approximate Calories Burned
Rough estimates put one round at around 13–15 calories, varying based on body weight, pace, and effort. Twelve rounds done at a steady clip amounts to something comparable to a short brisk walk or light cardio session. These are general estimates, not lab figures — actual burn depends on too many individual variables to pin down precisely.
A Simple Daily Routine for Weight Loss
- 2-minute joint warm-up
- 8–12 rounds of Surya Namaskar at a steady, controlled pace
- 5 minutes of cool-down stretching
- A short walk, if time allows
Diet Tips to Pair With Practice
- Stay hydrated throughout the day — not just around practice
- Favour whole foods like dal, sabzi, roti, and fruits over processed snacks
- Maintain that two-to-three-hour gap before practice
- Don’t skip meals hoping it speeds things up — it usually doesn’t, and often backfires
Why Consistency Matters More Than Intensity
Six rounds daily for two months will outperform twenty rounds once, followed by a week off from soreness or burnout. Weight loss through Surya Namaskar is slow and lifestyle-based. That’s not a limitation — it’s what makes results last.